


I have “almost” finished my first ever kitchen remodel!! I can not even express how excited I am to have this done and how much I enjoy being in this space!! If you are like me you love a good before and after. I am sharing some of the BIG lessons I learned in hopes to save you a headache. Product links, styling details and reveal video are all included 🙂 (I feel like I am selling a product or maybe I am just that pumped). So without further ado..


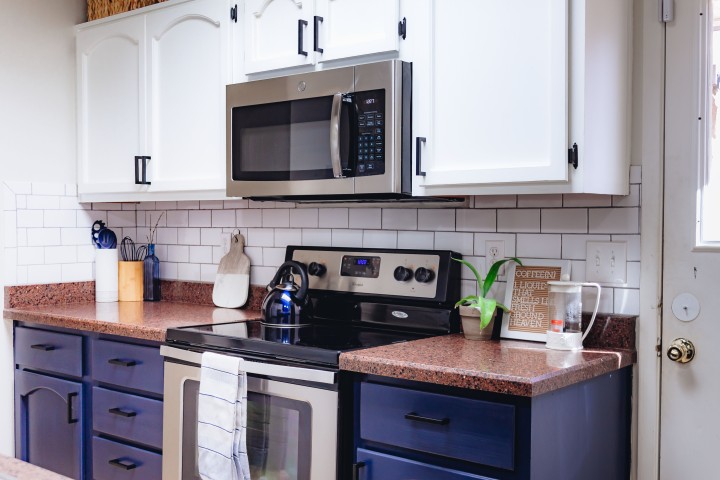
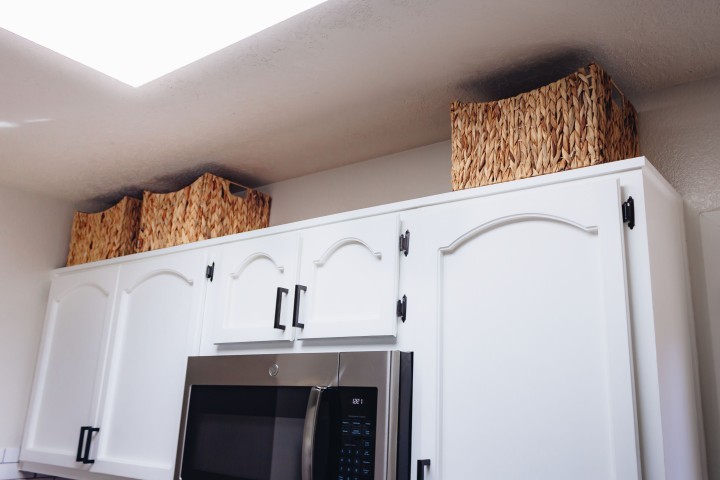
First thing we did in the kitchen was install the microwave above the stove. Since I love the cleaner slightly more minimal look; there was no way I was going to give up counter space to a microwave. The whole process took my Dad and I about 2 hours.

The next step was the bottom cabinets. This was one of the big learning moments for me. I had to start over on the bottom cabinets 3 times! We started sanding them and getting the paint started. However, I didn’t realize it was just too hot to be painting in the garage. By the time the paint would dry it would dry with a really wet sticky look to it. I would have to sand it down and paint another layer, and painting with the garage door open the wind decided to blow in a ton of leaves all over my wet doors and drawers. Needless to say I moved the cabinets inside and painted on top of tubs to be able to easily paint all sides of the cabinet with out the paint sticking to the cardboard. The white tops were a breeze once I had my set up and knew what I was doing.
Colors: Semi Gloss>4 layers
Bottom- Old Navy by Benjamin Moore
Top- Ultra White- Valspar
TIP: I would start with one side and half at a time. This way it is a smaller section you are working with and you can get all the kinks worked out on a smaller section of cabinets.


From there my Dad and I started tackling the backsplash on the outside kitchen wall. At this point I had not quite convenience my Dad to help me open up the other side and create a counter yet. ( I other words I had to sweetly and annoyingly ask a few more times. In fact, I took pictures and drew exactly what I was looking for with the pendant lights and send LOTs of inspiration pictures to convince him to help me put in the work to do it! Ha)
Here though, lies my biggest kitchen whoa. After my Dad and I laid the tile, using our tile saw to cut, measure and alternate tiles I started the grout process. I am a good little instruction reader and on the grout it states to let it sit for 30mins. Little to my knowledge at the time that meant after you wiped the first excess layer off. So I began the painful and frustrating process of scraping grout off my newly laid tile. HOURS later and many chipped tiles I was in tears. So frustrated by my simple mistake. What should have been finished that evening would take a look of time. I then went in and cut out the individual tiles that were too messed up to stay. Using a multi-purpose tool with a blade I tapped and scraped each tile out. Sanded the mastic down and eventually re-tiled.
TIP: Wipe the grout quickly!
Tiles: White Subway Tiles


Then the heavy work began. We started by opening up the dry wall in the area we were going to cut down. With the wall still braced and open we rewired the electrical to the track pendent lighting. The reason we chose track lighting was because the celling above had my duct work, so it wouldn’t be able to house a light box, so instead of drilling in we installed track plates so I could still get the pendant effect over the counter top.


After lighting we worked on a usb plug for convince by the countertop, drywalled the new walls, and retextured. We leveled the countertop and cut and place a board down to apply the marble tile. This process was the little details that took a lot of time, but made it worth it in the end. We followed the same tiling process for the countertop and finished it off with a trim.
New Open Side:
Pendant Lights: Black Lampshade
Counter: Carrara Marble


The small wall left next to the counter was load bearing. So to make up for loss cabinet space and to get a small fix in for my love of open shelving we added two 12in live edge shelves. This is probably on of my favorite parts of the kitchen! So simple and cute!
Open Shelving:
Floating Shelf: Natural Oil 12in

I then painted the whole kitchen Silver Satin > Benjamin Moore
We then installed the recessed lighting. I was SO happy to get rid of the nasty little fan and broken light that existed before. Adding in these new lights plus two more made a WORLD of a difference. These lights were also a STEAL at $14 each and so easy to install. I highly recommend these lights. Installing the extra lights took a long drill bit and a little elbow grease.


I also sprayed the vents with white spray paint to give them a fresh look again, added caulking and little touch ups.
The last step before styling was the hardware. Here I learned another lesson… not to get caught up on the small details. I wanted so desperately to have hidden hinges, but it was hard to find the right ones and when I did they were $15 a pair. I finally had to let that idea go and just replace the hinges with new black ones. I also had a fun hiccup with the cabinet pulls and the first time I ordered them they were delivered to Pennsylvania and I live in the southwest. After a refund and more searching I finally found similar pulls I ended up loving.
Black Hinges– Fair warning this product was on the cheap side and it did reflect in the quality.

Coming Soon
The last few changes I want to make is a new sink, new floors and new appliance. All of which are thing on hold until other projects are finished, but for now I am super happy with the outcome for my first ever remodel project.
Finishing Touches
Most of the styling was thrifted finds or little bits and bobs I already had. I will link below available products.


Make sure to check out the full reveal video! I had so much fun working on this kitchen and watching my dream come to life. If I could do it over I would change just a few things. I would have thought about using a black grout to match the hardware and made sure all of the grey had the same undertones, but now I know and can apply it to the future. Hope you got some inspiration and go after your dream kitchen as well!
